 Before you take your new AR-15 out for target practice or into the field to do some hunting, the first thing you will need to do is zero in the iron-sights.
All rifles and upper halves with sights installed from the factory are bore sighted to 25 yards. The process takes some patience, but you will be spending valuable time getting to know your new rifle while making it as accurate as possible.
This article focuses on most flip-up and stationary sights. Sighting in with the carry handle is a bit more complicated.
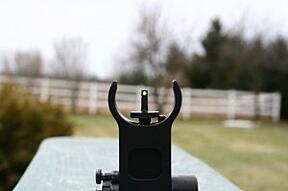
How the Front and Rear Sights Work
When it comes to zeroing the iron-sights on your AR-15, it’s important to understand what the front and rear sights do. The front sight is responsible for elevation, or how high or low the point of impact is compared to the point of aim. The position of the rear sight will determine the windage, or whether your shot will hit to the left or right of the target.
The First Step: Finding Mechanical Zero
Adjusting the iron-sights to mechanical zero is the first thing you should do when sighting your rifle or upper half. However, if it was purchased directly from Stag Arms, you can skip this step. Start by rotating the front sight post up or down until the base of the post is flush with the sight well. Once that is done, move on to the rear sight.
Most sights on an AR-15 have both a large and a small aperture. The large aperture is used for close up shooting and typically has a line that you can use to align it with hash marks along the bottom of the rear sight. If the aperture doesn’t have a mark, simply rotate the windage knob until the aperture is all the way to the left or right.
After that, turn it all the way in the opposite direction, counting clicks as you go. Divide the number of clicks by two to determine the center of the rear sight. Then, move the rear sight that number of clicks from one of the sides.
Using The Stag Arms Sighting Target
Once the iron-sights are mechanically zeroed, or if you received it from our factory, you can start adjusting them for accuracy. Fire groups of five shots at the target from a distance of 25 yards. Find the center of your groupings and measure from there to the central vertical and horizontal lines in order to determine how far you need to adjust the sights. If the shots appear all over the target and aren’t in groups, focus on the shooting fundamentals until you achieve groups.
All the lines on our sighting target are in 1” increments from the center of the bullseye. To move your groupings to the left, turn the windage knob on the rear sight to the left and to the right to move your grouping to the right on the target. Looking from the top of the sight, the front sight post will need to be turned clockwise to raise groupings and counter-clockwise to lower them as they appear on the target.
Basically, you will want to move the rear sight in the direction you want your shots to appear on the target, and you will want to move the front sight in the opposite direction that you want the shots to appear on the target.
Print out our sighting target here.
Photo Courtesy of: www.ar15news.com